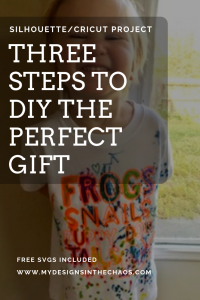
DIY Coloring Book Shirt Tutorial
share on social:
Picture this…. It is a Saturday morning and you just realize that you have a birthday party to attend TODAY! You don’t really know the child, but your little one has been begging to go so of course how can you resist. This super easy coloring book shirt is exactly what you need to whip up in less than 30 min to wow your little one’s classmate. It will be simple (and affordable) for you, and an interactive gift for them.
Let me show you how easy it really is. Just add a package of markers to the finished project, wrap it up cute with a bow and you will be all set to go! If you are more of a visual person, we also have a video down at the bottom highlighting the entire process.

Please note that links on this posts are affiliate links. This means at no extra cost to you we get paid a small percentage when you shop through them. Thanks!
SUPPLIES
Design that is only an outline: We have 5 free coloring book SVG files here for boys, and here for girls
Heat Transfer Vinyl: It can be any color that you want the outline of your design to be.
Blank T-Shirt: Light colors work best so that the kids can color on them
Cutting Machine: Silhouette or Cricut
Weeding Tools: These are my favorites here.
Heat Press or Easy Press (even an Iron would work)
If you want to personalize your shirt, the fonts Uncle Grump and Tinker are great because they already have an outline version. It is possible though, to turn almost any font into an outline by adding an offset to your image and cutting that with the original. Then weed out the inside of the words.

Step One
Upload your design into your cutting machine program. If you are a Design Space user we have step by step directions here of how to upload an SVG. If you are using Silhouette Studio remember that you must have Designer Edition or higher in order to read an SVG. Otherwise you will need to upload the DXF file.
*Please note that DXF files cut SUPER SLOW. That is just the nature of the file. Do a small offset around the design and cut that instead.*
Cut your design out on Heat Transfer Vinyl and don’t forget to MIRROR the image! Since using Heat Transfer Vinyl, if the image isn’t mirrored it will look backwards on the shirt when applied. Check out more of our tips on how to NOT WASTE VINYL here.
This step should be very quick because the entire design will be cut at once. There are no layers, color changes, or sections. Think of a coloring book…. All one outline, which is the exact look we are going for here as well.
While the outline is all one color it is possible to make that outline whatever color you want. Purple, Blue, Green, or even doing a printed HTV where the outline would be multi-colored. The options are endless really. In addition to adding a name to the design, the outline color is a fun place to make the shirt more personalized.
Step Two
Now that the design has been cut it is time to weed. (if the verb weed sounds weird I want to direct you to this post here) ? Before you start to weed though, here is a Pro Tip: Turn on your press NOW! That way when you are ready to press the design will already be warmed and ready for you. I find that to be a major time saver so I’m not standing around just waiting. With the limited amount of time I usually have to work with, I like to be as efficient as possible.
The press that I have is this one in black but I have also heard great things about the Cricut Easy Press. The Easy Press would be great to take with you to a craft show since it is much more portable than a standard heat press. An iron would also work but just make sure that when you are done, you can see the fibers of the shirt through the vinyl. That is the secret to knowing you had a good press.
Step Three
Now it is time to finish up the project with a quick press. I’m am an eyeballer (is that a word?) so I just place my design where I think it looks good. For those of y’all who want things to be 100% exact though, check out this post for our pro tip on getting designs centered every single time. This handy tool is also great for those who want things to be exactly in line. Check out more of our favorite crafting gadgets here.
When pressing the design follow the directions that go with the specific type of Heat Transfer Vinyl you are working with. Typically though I put my press on 305-315 and press once (with the Teflon sheet over your design) for 15 seconds. Then, I peel off the carrier sheet and press again (again also with the Teflon sheet over your design) for another 15 seconds. The Teflon sheet helps protect the vinyl so it doesn’t melt or burn.
I also like to use a pressing pillow. (especially when working with children’s shirts) You can learn why you should be using a pressing pillow and how to make your own affordable version here. Or if it’s easier just purchase them here.
And that’s it! Easy as 1, 2, 3! Now just package it up with a set of markers and gift it.
If you are looking for a few fun coloring book designs we have some freebies here and here. Also these are our top 3 fonts that we like to use with coloring book designs:
As long as the design is an outline you should be good to go!
Check out the video tutorial of this Coloring Book Shirt here:
Have you made a coloring book shirt for a gift (or maybe for your own kids)? How did it turn out? We would love to see a picture of it so make sure to head over to our Facebook Group here and show it off! ‘Til next time, happy crafting, cutting, and chaos.

Learn to develop, and grow your crafting skills!
My mission is to develop, encourage, and grow your crafting skills, and confidence through freebies, tutorials, our club, and our signature course.

Behind the Chaos...
My name is Michelle and I am the creative director behind the chaos. I'm so are glad you are here and hope you find inspiration and confidence to create something beautiful out of the chaos in your craft room and in life.
free ebook!
Bring your creativity to life quickly and easily.
This guidebook will give you a detailed look into the creative crafting cycle called the Craft Maker Process.