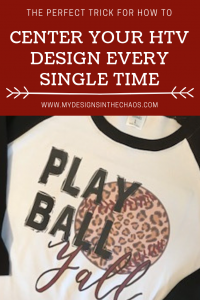
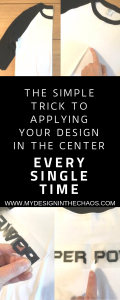
How to Center Heat Transfer Vinyl
share on social:
When pressing a design on a shirt, one thing that must be 100% accurate is that the design is centered. Nothing is worse than finishing a project that you have worked hard on, only to discover that it has to be redone. So, today I’m going to show you a little trick for how to Center Heat transfer Vinyl every single time. Follow along step by step as we demonstrate how to easily get your design centered.
How To Center Heat Transfer Vinyl
To begin with, the design needs to be weeded and ready for pressing. Not sure what I mean?…. Check out this post here that explains what weeding is.
Then, the first step in this trick is to take the item the design will be applied to and fold it in half (shoulder to shoulder). Like this:
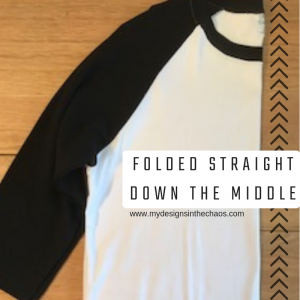

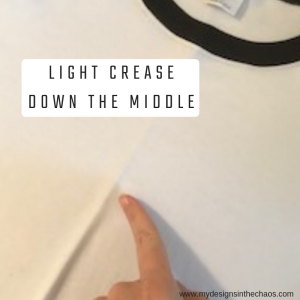
Next, give the item a light press. It doesn’t matter if it is pressed with a heat press, the easy press, or even with an iron, just as long as there is a small crease.
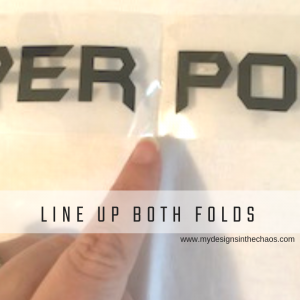
Now, it’s time to find the center of the design. Fold the design in half, sticky sides facing out.
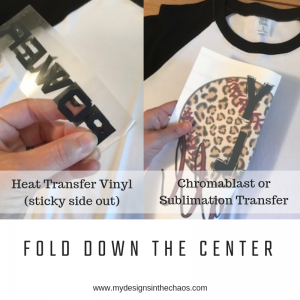
Now, line up both of the folds from the design and shirt. Use a few pieces of this heat tape to keep it in place while you scoot the shirt and design over to press. Press the shirt and remove the heat tape and carrier sheet. (don’t worry, the tape doesn’t leave a residue)
If the design needs to be in the exact center of an item then repeat the process above by folding both side to side AND bottom to top. This will create a cross-hairs and an exact center point to line up.
So there it is….. A super easy trick to Center Heat Transfer Vinyl every single time. It even works with sublimation designs as well.
Need something more precise? Grab this laser to get things 100% exact every single time and check out our Amazon shop for more of our favorite crafting tools.
Used this trick? We would love to hear about it below! Make sure to share this tip with a friend because friends don’t let friends press crooked shirt designs.
17 Comments
Leave a Comment

Learn to develop, and grow your crafting skills!
My mission is to develop, encourage, and grow your crafting skills, and confidence through freebies, tutorials, our club, and our signature course.

Behind the Chaos...
My name is Michelle and I am the creative director behind the chaos. I'm so are glad you are here and hope you find inspiration and confidence to create something beautiful out of the chaos in your craft room and in life.
free ebook!
Bring your creativity to life quickly and easily.
This guidebook will give you a detailed look into the creative crafting cycle called the Craft Maker Process.


Please help. I’m new to htv and have messed up multiple shirts. Is there a way to get the htv off the shirt that actually works. I’ve tried several from Pinterest with no luck
Hey Susie! I know that CSDS vinyl has a product called not so final vinyl and while I haven’t used it myself I have heard amazing things about it. That’s where I would recommend to start. 🙂
I ordered a product called VLR Letter removing Solvent No. 1020 by AlbaChem. You cannot use it on acetate fabrics.
I haven’t used it yet so I can’t vouch for it but it’s another option for you to check out. I ordered it on Amazon
I use the VLR. I use it on all my mistakes. my hints are use a wood cutting board slid inside the shirt. use a plastic scraper to lift the vinyl your removing. when pouring on soak the vinyl and start removing when you see it puckering up. then wash it right away. either hand wash it out right away or washing machine alone. hang dry or dryer. dont wash it with other clothing. the chemical is strong so you may want a window open.
I’ve had to remove lettering from a teeshirt or two, and I use my flat iron for my hair. I simply make sure the letter is over the heat plate, pulled taunt, and I use a small plastic scraping tool. The glue usually comes with the letter because of the heat.
As a side note, That same flat iron has a temp reading and I have used it to apply smaller htv items onto hat, shoes etc.
I recently watched a vid on a FB site I am on where a lady was taking a small heart off a t-shirt. She didn’t want it on the design she had ironed on. She took Acetone Fingernail Polish Remover and soaked the backside of the heart then she put the remover on the front of the heart. She then carefully starting peeling the heart up at one edge. It came off pretty easy. She then used the remover to lightly scrub away any residue left from the heart off the shirt. I have not tried this method but it seemed to work really well.
I use this Technic all the time. I also use a steel ruler so no risk of plastic melting. I measure 2 inches down from the the top seem to the top of the transfer to get it a uniformed center on all my tops. Lots of trial and error but it works for me. Also stalhs has a free guide you can download that shows how to perfectly line up all sorts of apparel. From tshirts, polos leggings hats. just so many. Its free and helped me so much.
[…] I couldn’t help giving a little bit of a chuckle with this design. Ever heard the expression ‘This isn’t my first rodeo’? Well for some people it is! Everyone has a first rodeo and you definitely need a shirt to celebrate it! Check out our tip to make sure your design is centered every time here! […]
[…] Check out how to get this design 100% centered on your shirt here. […]
[…] or you can measure. Those of you who prefer to find the exact center, check out this post here. We share our secret for always having things totally […]
Thanks for the tips on centering it. I had folded my shirt in half and used a pin for my guide but iron crease would help also. Now any tips on making one side of the design is not higher than the other? What I did was to measure the top of the shirt on each down to the beginning of the design. That seemed to work. Any other ideas?
Thank you
I would just crease the design as well and then line up the creases… this should center it pretty well. 🙂 So glad it was helpful!
Im trying to download last days of school files but cant figure it out! Please help
You should be able to click on the link that is the file name and it will download directly to your computer. If you are on a mobile device you will need to make sure that you have an app to open up the zipped file. Hope this helps!
DIY iron-on transfers are a fun and easy way to add a personal touch to your clothing and accessories. I get my ideas and transfers at Kraftyme.com
Thank you so much for this tip!! I’m horrible at centering things!!! You are amazing, and thank you for all of your free designs!
You are very welcome!