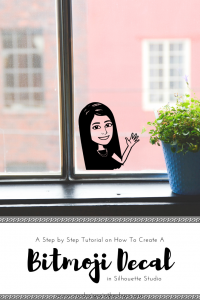
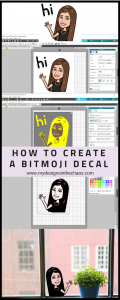
How to Create a Bitmoji Decal
share on social:
I just love Bitmojis. They are fun, cute, can be personalized, and have a bit more sass than a regular emoji. I think it would be super cute to put mine on my craft room door. So today, I am sharing with y’all the process for How to Create a Bitmoji Decal in in case you might want to do the same. Let’s get started.
*please not that Bitmoji graphics are trademarked and should not be sold*

Step 1
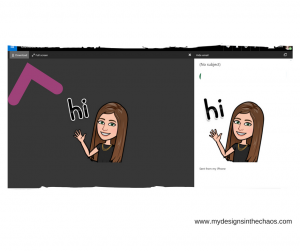
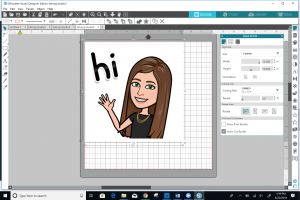
First, you will need to select which bitmoji to use. From your phone head to the bitmoji keypad and select the character you want to transform into a decal. (I like to use this ‘hi’ one pictured below to keep it simple) Once you have picked the one that you would like, will copy it to the phone’s clipboard.

Step 2
Now that the bitmoji is copied, it is time to open up email (still from your phone) and paste the graphic. After it is pasted, email it to yourself for easy accessibility on a computer.

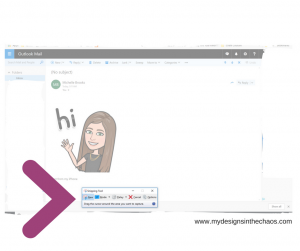
Step 3
On this step you have 2 options but for both an actual computer is needed.
- Option 1- Download the graphic onto the computer
- Option 2- Using the snip tool save the image onto the desktop
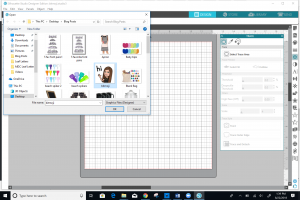
Step 4
Open up the Silhouette Software and then using the open tool, find the graphic on the computer (either on the desktop or the downloads folder depending on which option above you used) and select it to open into the software.
Step 5
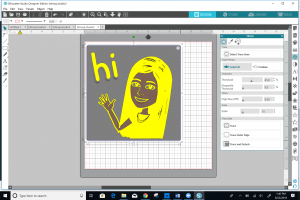
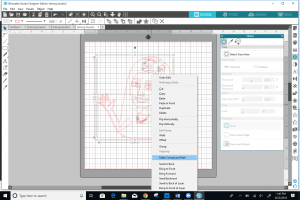
Click on the trace tool and trace the bitmoji. (select area>trace) Once it is traced, release the compound path and clean up or delete any parts not needed for the bitmoji decal. (maybe the words hi, or maybe some tiny dots you don’t want to weed) Once you are done, I recommend selecting everything and making it a compound path again. This will make it cut much smoother.
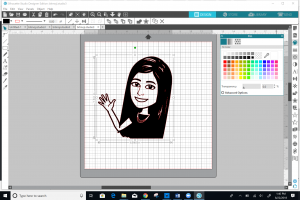
And that’s it! Now you have a bitmoji graphic that is ready to be cut and used as a decal that you can place around your house or office. Simple right?! You could even mirror it and cut it on Heat Transfer Vinyl for a shirt or bag! Curious as to how to create a shirt with HTV? Check out this post where we walk you through the process.


I can’t wait to see your bitmoji and where you decide to place it! Make sure to share in the comments below or over on our FB page.
20 Comments
Leave a Comment

Learn to develop, and grow your crafting skills!
My mission is to develop, encourage, and grow your crafting skills, and confidence through freebies, tutorials, our club, and our signature course.

Behind the Chaos...
My name is Michelle and I am the creative director behind the chaos. I'm so are glad you are here and hope you find inspiration and confidence to create something beautiful out of the chaos in your craft room and in life.
free ebook!
Bring your creativity to life quickly and easily.
This guidebook will give you a detailed look into the creative crafting cycle called the Craft Maker Process.


Love it, I will try it out.
Thanks for the information.
Absolutely! We can’t wait to see your bitmoji! 🙂
Love this! I have one on my classroom door but have been trying (and failing) to make one that’s not just black. Basically I want Bitmoji to send me an SVG file but that isn’t happening. 😉 Any tips or ideas?
That would be nice to have Bitmoji send a file LOL! 🙂 My couple suggestions would be maybe use a character that has a design on the shirt so when you trace it you don’t have all black? or you could also add an internal offset on the shirt and then just cut the outline rather than the whole thing being black? Also make sure to adjust the trace settings (you can play around with them) till it looks the way that you want.
Good luck! We can’t wait to see your final project!
Is it possible to make the Bitmoji in Design Space? I don’t think there is a tracing tool. Thanks
Hey! While Cricut doesn’t have a trace if you save the file as a jpeg you can bring it in and use the little wand selection tool to copy and paste it and select which parts you want….then send it to cut. It is a form of the trace method.
I want to do this for my classroom door! What material did you use on your window bitmoji?
Having one on your classroom door would be adorable! I would recommend using 631 (removable) so that if you change classrooms you can take it down easily. But 651 would also work! Read about the differences between the two here.
I am in love with this IDEA! Thanks!
Yay! I’m so glad that you like it! We can’t wait to see your bitmoji decal! 🙂
An amazing find, I too love my Bitmoji. Thank you for the inspiration and thorough instructions. I was able to follow your thorough instructions and create Christmas stickers seals for my cards. I posted it as one of my Pinterest Tries (https://www.pinterest.com/pin/777926535615139767/activity/tried).
Those are adorable! So glad to help! 🙂
I’m so excited about this but I am stuck on the part where I ‘clean it up’. I traced, released compound path, but I cannot figure out how to delete or clean up bits. Hoping there is a simple explanation to get me past that part!
Thanks!
Once you have released the compound path you can deselect the figure and then just select each area that you want to delete/clean. So if there is an extra shadow or line this is the spot where you can correct that. 🙂 Hope that helps!
I’m in love with this! is there a way to print this out in different colors, so it isn’t all just black? I really want to make mine come alive like it actually looks and place it on my machine with a saying! Thanks for the help in advance!
Hello! Yes you can absolutely do this in different colors. The best way to do that is to create the bitmoji as an SVG in Inkscape in layers instead of one trace in studio. Then cut each layer of vinyl in the colors you want. 🙂
Hi. I just came across this instructions and absolutely love the idea. I followed every step and was able to go as far as tracing. However, there were double lines around my trace and wondering how i can clean that up. I tried removing some of it, but the image does not look right. Thank you for sharing!
Double check that you don’t have an offset and the trace. Sometimes that can make a difference. You might have to go in and right click
[…] use a Bitmoji? Cut out a vinyl decal with your Cricut and post it on the board or your door! Give this tutorial a […]
[…] use a Bitmoji? Cut out a vinyl decal with your Cricut and post it on the board or your door! Give this tutorial a […]