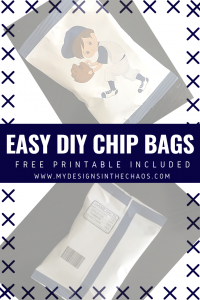
Potato Chip Bag Cover Tutorial
share on social:
For my boys, chips are always a go to essential at parties, snack time, and even sporting events. I wanted to be able to make the bags still look cute no matter where or what we were celebrating. Today I have a super simple potato chip bag cover tutorial for y’all.
Also as a side note, I ended up using these for my son’s baseball team snack so I provided the free printable below for you to use as well. Just scroll down to the bottom to download it.
If you are more of a video person scroll down and check out the live we did on Facebook demonstrating exactly how easy these are. These potato chip bag covers are definitely going to be my go to party decor from now on.
PLEASE NOTE THAT THIS POST CONTAINS AFFILIATE LINKS. THIS MEANS WHEN YOU SHOP THROUGH OUR LINKS, AT NO EXTRA COST TO YOU WE EARN A SMALL PERCENTAGE OF THE SALE.
SUPPLIES
Free Chip Bag Cover (scroll down to download)
Check out more of our favorite crafting supplies and tools here.

Instructions:
Step One- Download the printable document below to your computer. Make sure to unzip the file (right click and select extract all) in order for it to open.
Then open it up and print exactly as pre-sized. Each bag cover will take up one page. So if you have 15 bags you want to cover just print the printable 15 times. Super easy.
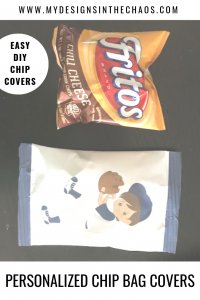
I personally used just normal printer paper and was 100% pleased with the more matte finish. (my pocket book also thanked me) But as another option, you could also do glossy photo paper if you wanted to give it more of the ‘real’ chip bag look.
Step Two- Once you have a design printed on each page it is now time to package. Apply adhesive to the top and the side of the printable. You will want to apply it to the back side of the printable edge that has the blue line.
This one will be on top when you wrap it up giving a seamless look to the closure.
Then seal the tops and bottoms together as well.
Step Three- Now, using either plain scissors or decorative scissors cut the top and bottom white space off of the bag. Make sure that it is still sealed and that you haven’t accidentally cut off the part that had the adhesive too.
Step Four- Crimping time. Place the top of the bag into your crimper. Pull the handle of the crimper closed and then turn the wheel so the gears move. Turn it back a forth a few times to get a nice sealed looking edge.
Do this for the top and the bottom of the bag.
Ta-Da! Beautiful personalized chip bags that will give your decorations an extra umph!!

Watch Us Make them on Our Facebook Live here:
(Warning: my adhesive ran out, the tape didn’t work, and I was a little bit of a mess… It’s real life though right?)

DOWNLOAD YOUR FREE BASEBALL CHIP BAG COVER HERE:
Baseball Chip Bag Printable Cover
We always love to see what you are making and creating with our tutorials! Head over to our FB group and post a photo of your personalized chip bags today!
Make sure to also head over and check out some of our favorite SVG designs too. If you like this printable you will love the baseball files!
15 Comments
Leave a Comment

Learn to develop, and grow your crafting skills!
My mission is to develop, encourage, and grow your crafting skills, and confidence through freebies, tutorials, our club, and our signature course.

Behind the Chaos...
My name is Michelle and I am the creative director behind the chaos. I'm so are glad you are here and hope you find inspiration and confidence to create something beautiful out of the chaos in your craft room and in life.
free ebook!
Bring your creativity to life quickly and easily.
This guidebook will give you a detailed look into the creative crafting cycle called the Craft Maker Process.


Thank you so much for the chip covers. My grandsons thank you too❗️I used to demonstrate products in my career and could sympathize with your tape dilemma. Good job
Thank You! 🙂
Have you ever taken the chips out of the original bag and put into the chip bag you made? so cute:)
I haven’t. I always just leave the original bag in tact and use this as a decorative accessory. 🙂
do you do printable if so how much
Hello! I’m not currently accepting custom orders. Thank You so much for asking though!
Can I change the picture from a baseball player to a football player
With this design I don’t currently have an editable version. Sorry!!
This is great. Would you happen to have one for goalie ice hockey? My nephew has a birthday coming up and he will be 10. Thanks for all your great designs
Hello! I don’t at the moment but thank you for the suggestion. 🙂
Did it all fall apart when someone “opens” the bag to eat?
Yes they are just decorative 🙂
Thank you so much. I watched multiple videos and your video was the easiest. Im going to try this. Lol hope it turns out ok.
Shirley
Hello! I printed mine and the ink is rubbing off my design. Do you know what I might be doing wrong and how I can fix it?
Hmmmmm it sounds like it might be the kind of paper used with your printer!