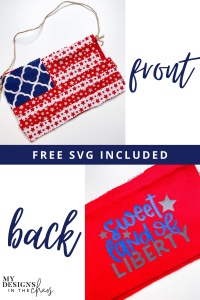
DIY flag, just in time for summer celebrations
share on social:
Summer is coming, and that’s when we get to celebrate all things American. Hot dogs, apple pie and the 4th of July! This week our Make It with Michelle project is an adorable, patriotic DIY flag you can fly in your home all summer. This project even includes a freebie design so you can make your own flag.

Remember, every Monday we’ll do a project — our goal is to help develop, encourage and grow your crafting skills and confidence. Here’s how this weekly project on Facebook live works. On Sundays, I post a preview of two designs on Instagram, and all of you get to vote for which one you want me to create with on Mondays. It’s a really fun way to learn and to be part of the process.
This week, it was such a close call, and this design won out with just three votes — so remember that every vote counts! As a reminder, Club Chaos members will get both designs we previewed. And if you didn’t get a chance to vote this week, be on the lookout next Sunday for your next chance!
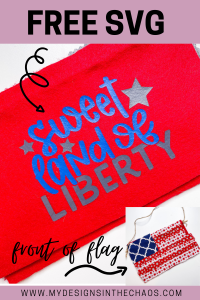
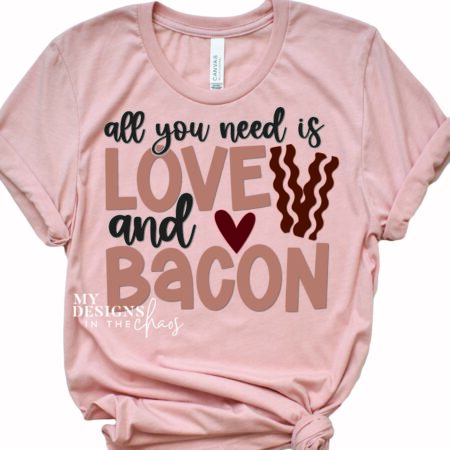
Grab this Free SVG that won the Sunday vote below!
![]()
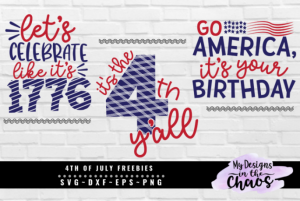
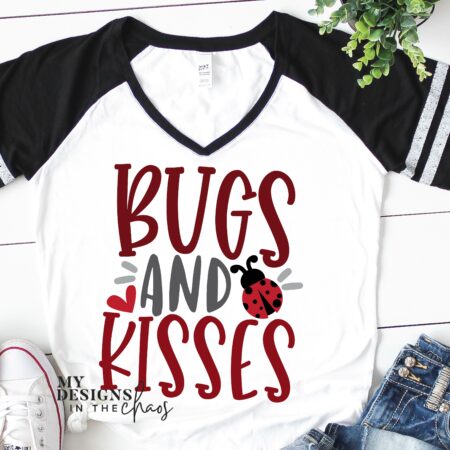
This is the other design that Club members received. Remember they get both designs!
![]()
Learn more about the club HERE:
Check out our step by step video on FB of us making this DIY flag live here:
We’re definitely going for the rustic look with this DIY flag. I think the messier it is, the brighter it shines! You can even personalize your flag by adding your name or initials with HTV onto the blue “stars” area. And your stripes do not have to line up exactly at all— in fact, the, messier, the cuter! What we’re making is a messy, DIY flag.
Supplies we’ll use for our DIY flag:
- Some kind of stick or skewer (you can use a plain stick from your yard if you want) — you’ll want this to be longer than your felt
- Piece of felt (8 1/2 x 11), cut into 2 pieces (I used red)
- Any kind of patriotic cotton fabric (I used red with white stars, white with red stars, and blue with a white design)
- Heat transfer vinyl (HTV)
- Pinking shears, if you have them, or regular scissors
- Glue gun or fabric glue
- Twine

Step 1
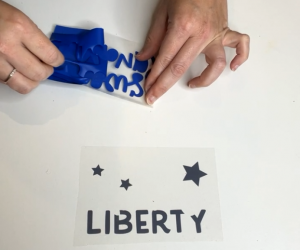
Cut and weed out the vinyl design. Remember — since we’re using HTV, don’t forget to mirror your image before you cut.
Pro tip: when you’re weeding HTV, remember that it is not sticky. The only thing that’s sticky is the carrier sheet the vinyl is attached to. HTV doesn’t get sticky or adhere until it gets hot. Yes, it looks backwards, and that’s how it should look. When it’s pressed onto our project, it will read correctly.
The way that I cut this design was in two sections – one for each color. I used a piece of red felt as my base. And I like to use felt because I like the sturdiness of it. I didn’t actually have any white HTV on hand, so I used blue and grey, and those colors should really pop against the red. Here’s where you can really put your own stamp on this project, by using glitter, sparkle, iridescent, or whatever color HTV you want for your DIY flag.
Step 2
Before I start pressing HTV, I like to line up all the sections. I like to see where they’re going to go and make sure they will fit together. Do not press them like this though! I can’t say this enough. Then I take the vinyl sections and line them up on my base, wherever the design is going to go. Then I peel the top one off, leaving the bottom one, which is already in place.
Step 3
Press the bottom layer (the word liberty and stars) for only about 3-4 seconds (at 315 degrees). You don’t want to do a full press because you might see shrinkage or burn the base of your project, especially if it’s felt. Remove the carrier sheet. Put the next layer into place, press for the full 15 seconds and remove the carrier sheet. Just be really cautious not to burn the felt. And now we have one side of our DIY flag completed! On to the second side!
Step 4
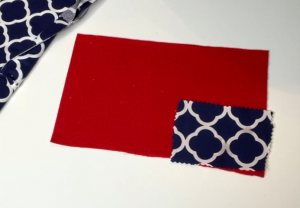
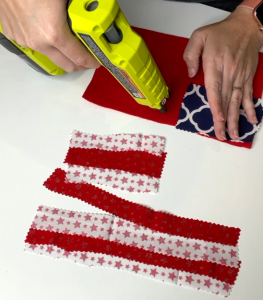
Here’s where the fabric comes in. Trim off a rectangle to use in the upper left corner, to represent the stars of our DIY flag. I used pinking shears, because they will help keep the fabric from fraying. Use a glue gun, fabric glue or another glue to secure the rectangle in place. Next, use the red and white fabrics to make stripes. Use the pinking shears to cut strips. Lay them out on your flag before gluing to make sure they look how you want them to. And remember, they do not have to line up exactly— you can even overlap some of your “stripes” if you want.
Step 5
Once you have your stripes all lined up, flip your flag over so the blank felt side is facing up. Flip it back over without your fabric strips, put a line of glue on the felt, and secure your first strip of fabric. It’s super simple — just put down a line of glue, and place the fabric. And because you flipped it over, keeping everything the way it was lined up, there’s no second-guessing placement. Since we’re using cotton, it doesn’t need a ton of glue to hold. Keep gluing fabric strips until your flag is finished.
Now we have a super cute, simple flag for one side, and the other side has our saying.
Step 6
Take one side of your flag and lay it on your surface, design side down. Put a line of glue along the top of the back side of the flag. Attach the stick so some hangs out on each side of the felt. Add more glue, some to the stick itself and some alongside it, and attach the back of the other flag piece (design side facing out). Make sure the top of the one side lines up to the top of the other one. Just kind of sandwich it down around the stick so it attaches. Glue the two pieces together along the bottom edge, if you want.
Want to add some finishing touches to your patriotic saying? You could use a small bow, some rhinestones, or maybe some fabric stars. Just be creative and make it your own!
Step 7
Tie a piece of twine to one side of the stick, leaving enough slack for your diy flag to hang, and tie it to the other side. Twine fits right in for this rustic look.
Learn more about joining the Club and snagging both designs here:
And now you have the cutest little DIY flag to decorate your home as a door hanger, wall art, or wherever you need to add a touch of stars and stripes to your home this summer. You could hang it on a glass-panel door, or even use it as a decoration on your picnic table. All we did was take some felt, fabric, and a cute phrase and stars SVG, then we used a little glue, and we made our patriotic home decor project in just seven easy steps.
As always, I want to see what YOU are creating. So if you make your own DIY flag, show it off! You can tag us here, in our Facebook group and on Instagram. Help us spread the love about Make it with Michelle Mondays, and don’t forget to vote next Sunday for your choice for the project of the week!
Pin This Project Idea for Later:
Download Your FREE SVG Here:
Sweet land of liberty FREE SVG FILE
Please note if you are on a mobile device you will need an app to open and access the SVG file.
If you loved this design then you will also love these 4th of July Free SVG files.
12 Comments
Leave a Comment

Learn to develop, and grow your crafting skills!
My mission is to develop, encourage, and grow your crafting skills, and confidence through freebies, tutorials, our club, and our signature course.

Behind the Chaos...
My name is Michelle and I am the creative director behind the chaos. I'm so are glad you are here and hope you find inspiration and confidence to create something beautiful out of the chaos in your craft room and in life.
free ebook!
Bring your creativity to life quickly and easily.
This guidebook will give you a detailed look into the creative crafting cycle called the Craft Maker Process.


Thank you!
You’re very welcome!
Love it! Thank you so much!
So glad you love it! You’re welcome!
Awesome SVG. thanks
You’re welcome!
Love these!! Thank you so much!!
You’re welcome!
Thank you so much!
You’re very welcome!
I just love all your svg files thank you so much.
You are very welcome!